Importing Quake files and previewing levels using Irrlicht (Part 1)
Introduction
This tutorial will show you how to use the Irrlicht graphics engine to load quake levels into Cinema4D (including the mesh, materials and textures) and then export that back out again to the Irrlicht graphics engine to preview how your game level will look. You will learn about creating polygon objects, materials and textures in Cinema4D and how to access the data again for exporting.
Getting Setup
Before we start you will need to setup your development environment. For this tutorial we are using Cinema4D 11.5, Irrlicht 1.6 and Microsoft Visual Studio C++ 2008 Express Edition. And in this tutorial we are running under Vista and Windows 7, but other operating systems should still work. Its best if you follow through the steps in the Getting started with the Cinema4D SDK and Visual Studio C++ 2008 Express Edition tutorial to get yourself setup. The important thing to remember is that you must copy across the DebugWin32.vsprops file in order to compile the plugin, read the tutorial to find out what to do.
Download the attachment at the end of this article and extract it to your Cinema4D 11.5\plugins directory. There should now be a irrlichtviewer folder directly within the plugins directory which contains the projects files. If instead you have a irrlichtviewer folder within a irrlichtviewer folder then you will need to copy the files down one level. This sometimes happens depending on how you do your unzipping.
You will now have to copy the Irrlicht.dll file down a couple of levels next to where Cinema4D is installed. On my machine it is located here... "C:\Program Files\MAXON\CINEMA 4D R11.5"
Note: If you don't want to compile just yet and only want to run the project then you can just start Cinema4D now skip to the Running the Project section below.
Right click on Visual Studio and choose "Run as Administrator" to run it with the ability to make changes to files within the "Programs Files" folder, which is most likely where your copy of Cinema4D got installed.
When you have installed Irrlicht onto your machine you will need to update the project paths to make sure it can find the right files. Right Click on the"irrlichtviewer" project and choose "properties". Open up the "Configuration Properties->C/C++-> General" section. At the top you will see the "Additional Include Directories". It will contain the text "C:\Projects\3rdParty\irrlicht\include". Change this to the include path of your copy of Irrlicht and click Apply. Next go to the "Configuration Properties->Linker->General" section. Find the text in "Additional Library Directories". It will currently read "C:\Projects\3rdParty\irrlicht\lib\Win32-visualstudio". Change this to point to the same location of win32-visualstudio as in your lirrlicht install. When done press OK on the dialog to save your changes.
Right you should now be all setup. From the Build menu choose "Build Solution".
If this doesn't build then you may have missed something in the tutorial on setting up with Visual Studio. Most likely if you are first time user you might not have seen the part on how to fixup the "_api" project. Check that tutorial now and then try building your solution again.
Running the Project
Now that you have the project compiling you can run the project. Select Debug->Start Debugging from Visual Studio. You will now be prompted for an executable file. Browse to the location of your Cinema4D.exe that you installed. Mine is installed here... "C:\Program Files\MAXON\CINEMA 4D R11.5". Make sure to select "Cinema4d.exe" and NOT the 64bit version.
Cinema4D should now be running. If you got an error about Irrlicht.dll then make sure you have copied it to the same location as your Cinema4D.exe
From the Plugins menu choose "IrrlichtViewer->LoadQuake". Move the viewport around to get a better view and you should now see something like the following image

You will notice in this image that you don't see any lightmaps in the opengl viewport. OpenGL in Cinema4d does not yet do any mixing of textures. To see what the end result with the lightmaps blended will look like choose Render->RenderView and you will see something like the following...

To see how this is setup we first look at the objects tags...
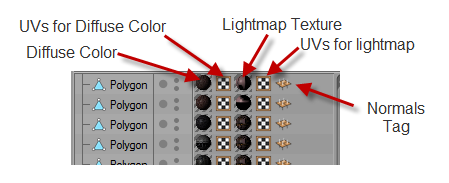
Each Polygon Object that is loaded in from Irrlicht has 2 Texture tags, 2 UV tags and 1 Normals Tag. These are loaded in in a particular order, that being the first Diffuse Color texture tag, then the UVs that should be used for that texture tag are next to it. After that we have the Lightmap texture tag followed by its UVs and finally the Normals Tag. If you click once on the Lightmap texture tag you will then see the following in the Attribute panel in Cinema4D.
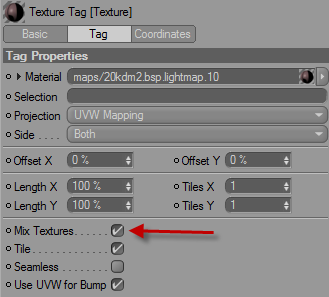
The important thing to notice here is that the Mix Textures tag has been turned on. This will mix this texture with the previous one (that being the Diffuse Color). Now double click on the Lightmap texture tag and you will see the following in the Attributes panel...
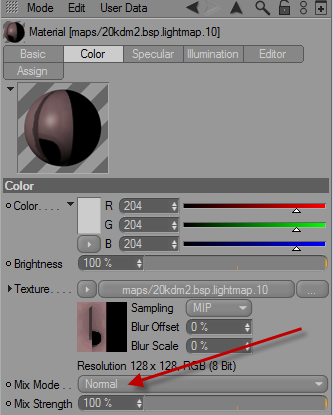
Here you will see the Mix Mode for this texture. It is currently set to Normal. Other options are Add, Subtract and Multiply. I found that Normal gives the closest result to the what is rendered in Irrlicht (which we will come to next).
View the Level in Irrlicht
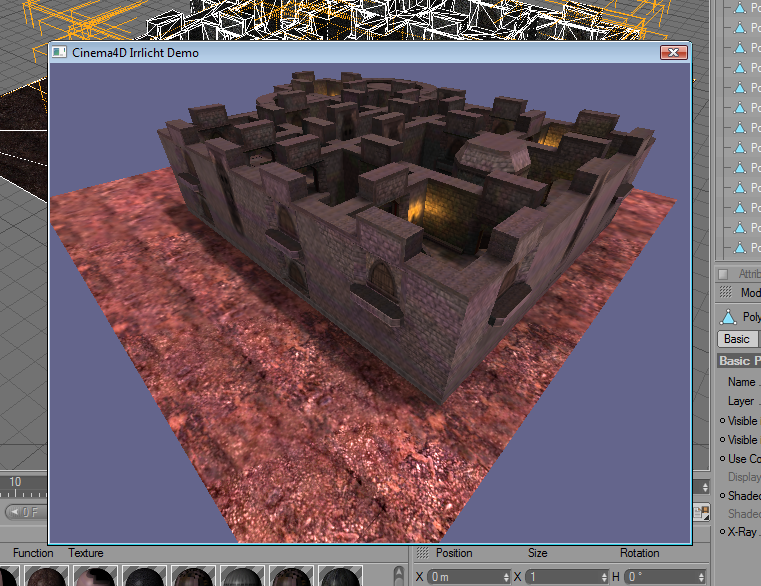
Now that we have the level loaded into Cinema4D you could happily start changing the textures, painting things, adding or removing geometry. But eventually you will want to see what its going to look like inside of Irrlicht. To do first select everything in the cinema4D viewport by pressing Cntrl-A. With everything selected go to the Plugins menu and choose "IrrlichtViewer->Run Game". A new window will appear with the level loaded into a Irrlicht scene. You can fly around the scene using your mouse and the Arrow keys on your keyboard. When you are finished press the ESC key to close the window. It should look something like the following...
Now thats about all there is to show at the moment. You can also create any other polygonal object and add a material with a diffuse texture and just select that and through to be viewed in Irrlicht as well.
Now we move onto how this was actually all done. There are 2 parts to this, those being the Loader and the RunGame commands.
In Part 2 we will look at the loader.
In Part 2 we will look at the loader.
Comments
Post a Comment